Monday 29 April 2013

Modern? Modernitional? Tramodernal?

Do you consider yourself a modern quilter, a traditional quilter or a bit of both? This seems to be a hot topic at the moment. If you're the latter like me then I like to refer to us as tramodernal.  At the start of my quilting journey I definitely wanted to think of myself as a modern quilter but as time has gone on I have become increasingly inspired by more traditional blocks.


I'm excited to share with you a project I worked on last month. Back in January, the Fat Quarterly team put a call out for people to take part in the next edition's designer challenge - to use a traditional block and make it modern.  I've always loved the Blockade block - a Civil War block, ever since I made this one.  It remains to this day an orphan and this is a reminder that I need to do something with it!


For the challenge I decided to make a cushion using some Chicopee and low volume fabrics. As I had a huge 22" cushion insert, I decided to go bigger and influenced by all the gorgeous medallion quilts being made, I added a clockwise 'circle' of flying geese - another traditional block which I only made for the first time this year.

Who would have thought Chicopee fitted in so well with our Moroccan floor tiles?


Issue 13 of Fat Quarterly is out now and it's full of seriously gorgeous tramodernal projects - and you can see how I made my cushion. So go have a look - you might be inspired!

Linking up with the Let's Get Aquainted Link-Up, which this week is being hosted by Kirsten.


Thursday 25 April 2013

Blog Claimin'

So I guess this is something I 'need' to do - claiming my blog on Bloglovin'

I hope you will continue to follow my blog by clicking on the icon over there on the right!


Wednesday 24 April 2013

Stash Defining

Make a scrappy trip around the world block or two and you soon see the colours in your stash so no surprises here - pinks, purples, greens and not enough blues.

Wall flower? No.  Pale and uninteresting?  Definitely not pale.


Loud, mismatched, colourful, in your face, scrapbusting...?


Not everyone's 'cup of tea' but I like it! Blocks 1-12 of the scrappy trip around the world quilt.

Linking up with WIP Wednesday.


Sunday 21 April 2013

If You Can't Stand the Heat Stay Out of the...

...sewing room! Well if I had a sewing room that is. And that's what I've been doing the last few days...well mostly.  It's still silly hot here but due to cool next week.  The heat hasn't stopped me from wanting to dive in to lots of new projects.

I've been looking at EPP (English Paper Piecing) projects and am really tempted to make some rose stars.  However, the propect of drawing the templates, printing them off, cutting them up and basting seemed too much like hard work and I have an existing EPP project which is far from finished.  So I have started joining my aqua, orange and grey hexy flowers in to rows of 8 and 9 - no real plan just taking a colour from each pile in a fairly random order.


There are lots of fun BOMs around (Block of the Month mum) and I made April's block for the Aurifil BOM using Chicopee and some of my low value charms from Laura Jane's recent swap.


I'm not sure now whether to continue and catch up or hop on to the Virtual Quilting Bee, which I also like the look of. I've a feeling this may be made in to a cushion for the small person.

Inspired by last week's episode of The Great British Sewing Bee (you can watch the first 3 episodes on youtube here, here and here if you have missed it), I did a bit of make do and mend.  At the beginning of the new year, Zaki went through the knees of nearly all his jeans. I loved a particular pair of skinny jeans from Gap and so cut them in to shorts and put a camouflage cuff on the bottoms - et voila! Ignore the dirty summer feet and open zip!

*edited to add: I was inspired to make these after seeing these jean shorts in Zara.


Lastly, I like to leave a few months before jumping on a bandwagon but this morning I had an overwhelming urge to start a scrappy tripalong quilt top.  I have lots of large scraps which I've had for ages and would like to see the back of or at least made in to a quilt. So following this tutorial, I cut up lots of strips and soon had the first four blocks done.  I'm not sure I have the scrappy tripalong vibe on just yet...I understand from the good folk on Instagram that it best works if you have a similar colour running through the middle of each block...as you can see I hadn't quite worked that out when I made these blocks.


And lastly, I really want to get this pattern by Jen Kingwell after Jess blogged that she was doing the Steam Punk QAL.  I have found it for sale in the States but wonder whether I should or not.  Has anyone done this pattern?

Tomorrow, Zaki will be back at pre-school after his 2 week holiday and so I hope to get on with basting and quilting Cindy's baby quilt.  Hopefully, a finish before the month end!

So I hope you have all had a great weekend - need to go tidy up the mess!

Wednesday 17 April 2013

Cindy Said Sew

Back at the beginning of March, the lovely Cindy over at Fluffy Sheep Quilting asked for a little help from her friends to make some baby quilts for a quilt festival in Galway this June.  She aims to have lots of new charm packs for sale and needs some quilts to show off what can be made with them! With many of the lines not available until May, she was up against it timewise.

She gave us ideas as to lines we could use and I chose the existing Mama Said Sew as Cindy had it in stock and could get it over to me immediately.

A couple of weeks ago this little ready made quilt kit of loveliness arrived.


So yesterday with temperatures hitting 40° C (104°F),the sensible thing to do would have been not to start the quilt top. Sensibleschmensible. Using this super straightforward Moda Bake Shop pattern I soon had this baby sewn up.


Now anyone who reads this blog regularly will know this isn't my usual colour palette but it's been fun to play with fabrics which I wouldn't normally use and so many of the prints in this line are lovely!


Temperatures are due to drop again at the weekend and then I'm hoping to get this basted, quilted and back off to Cindy next week!


If you don't know Cindy's shop, where have you been? Gorgeous fabrics, solids, Aurifil, perle, amazing service...need I go on?


Tuesday 16 April 2013

Stitch Tease Blocks Revealed

Photo Credits Top Row (Di, Susan, Danny, Helen)
                                 Bottom Row (Dianne, Hadley, Katy, me)
Yesterday I shared with you the gorgeous quilt top I received in the Stitch Tease bee.  Today, I'm revealing the bee blocks that I made for the 7 other bee members. I shall try and whizz through these as quickly as possible as after a year of teasing, you are getting Stitch Tease overload.

Having said that, the first does need a little explaining.

Bee mama Di asked for strips with words on them.  This was easy for me - Di often refers to her husband as Mr.Romance and this was my inspiration photo. Yep, he really is Mr.Romance!

Photo Credit - Diane Stanley
...and here's the strip I made for Di. It's a biggie at 72" long!

12.5" x 72"
So my words for Di were 'I LOVE US # MR ROMANCE'.  I appliqued one of Di's favourite flowers and the one in the photo, a sunflower, pieced a heart and as Di and her husband were learning Country & Western dancing this time last year I appliqued Mr.Romance in a cowboy hat. You can see the whole of Di's quilt top here.


Next up was Susan - Susan's block was a quick and easy make.  She asked for white wonky stars in amongst bright and scrappy squares and rectangles. You can see Susan's whole quilt top here.

20" x 30"
Danny was next.  I dithered and procrastinated over this one.  Danny gave us free reign to make what our heart desired but with so much choice it was tough to decide exactly what to make.  Eventually I made a strip of different blocks and incorporated a few of my favourites. You can see Danny's quilt top here.

12" x 70"
Helen's was a lot easier for me.  She asked for bright wonky stars against a background of Kona Ash.  Easy peasy. You can see Helen's quilt top here.

24" x 24"
Dianne asked for pinwheels - any pinwheels, any shape or size.  Now I had never made pinwheels before but after a perusal of flickr and pinterest I learned that there were many types.  I decided to include a Dutch pinwheel (far left) which I really love. She can see Dianne's quilt top here.

16" x 32"
Next up was Hadley - she asked for squares and rectangles of fabric in teals, aquas, oranges, greens, blues and greys.  By her won admission, she was quite specific about what she wanted in her block. There would also be a few white blocks randomly placed.  Now this block was simple but fabric choice had to be considered carefully.  You can see Hadley's quilt top here.

10" x 60"
Last up was Katy's block.  Katy asked us to replicate characters from her focus fabric.  I made the last option available - an appliqued space rocket! After this photo was taken I realized I hadn't finished the legs properly so I changed them but don't have another photo. You can see Katy's quilt here.

24" x 24"
So Round 1 is over and Round 2 kicks off next month. Big strips and blocks are gone and in comes more manageable 12.5" blocks!

Monday 15 April 2013

The Grand Stitch Tease Reveal!

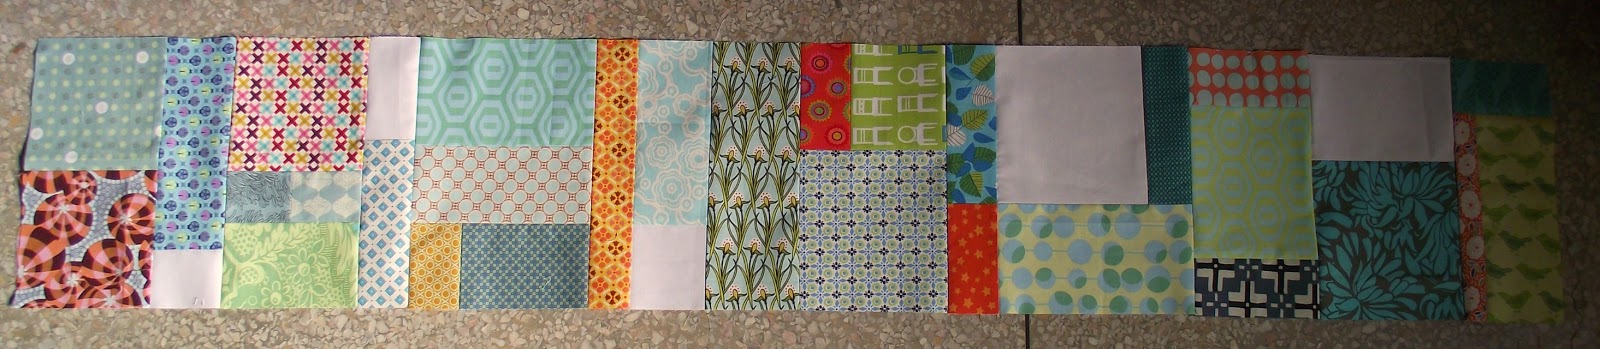
For the last year we've teased you, we've been coy and dare I say a little coquettish but today...at last...we can reveal our Stitch Tease quilt tops!


At the beginning of 2012, I received an email inviting me to join a mystery round robin bee.  The sender was bloggy pal Di.  She also sent the email to a few other bloggy friends and resistance was futile.  After a few emails ironing out the details it was agreed that we would make 2 starter blocks and post them to the person assigned to eventually making up our quilt tops which in my case was bee mama Di. The blocks we made for each other would remain secret until we received the assembled top!

I uhmmed and I ahhed about the theme for my quilt and eventually decided on curves.  This was my inspiration mosaic.

Stitch Tease Inspiration Mosaic
1. single girl - it's a wrap!, 2. Pear Blossom 4, 3. Detail of "Spot On" Circle Quilt, 4. asterisk detail, 5. For Quilt around the block, 6. Drunkard's path clamshells, 7. Drunkard's Path QAL, 8. Color Study: Drunkard's Path ~ 2009, 48"X52", 9. detail shot of the modern drunkard's path, 10. yellow drunkard's path block, 11. Not so little hint..., 12. Improv curve notecards, 13. FTLOS, 14. Squiggle pillow, 15. Baby Girl Quilt, 16. Drunkards Path for Amber aka One Shabby Chic - PTS 6, 17. anjas_amybutlerquilt_detail, 18. New Block Design :: Half Moon Rising, 19. Oregon born, NC bound, 20. Camera Roll-1097, 21.Sonnenschein lieblingsdecke krabbeldecke quilt frankfurt, 22. Retro Flowers Quilt, 23. retro flowers no. 3, 24. Neighbours, 25. Drunkard's Path Quilt

I asked for blocks measuring 24" x 24" and made my starter blocks.

Clamshells
Beads using Jenny's curved ruler

Each of us bought a yard of fabric which we would use in all the quilts - I used this Cloud 9 fabric.

In hindsight I realize that my theme was a little unfair but you know what, the girls did an amazing job!

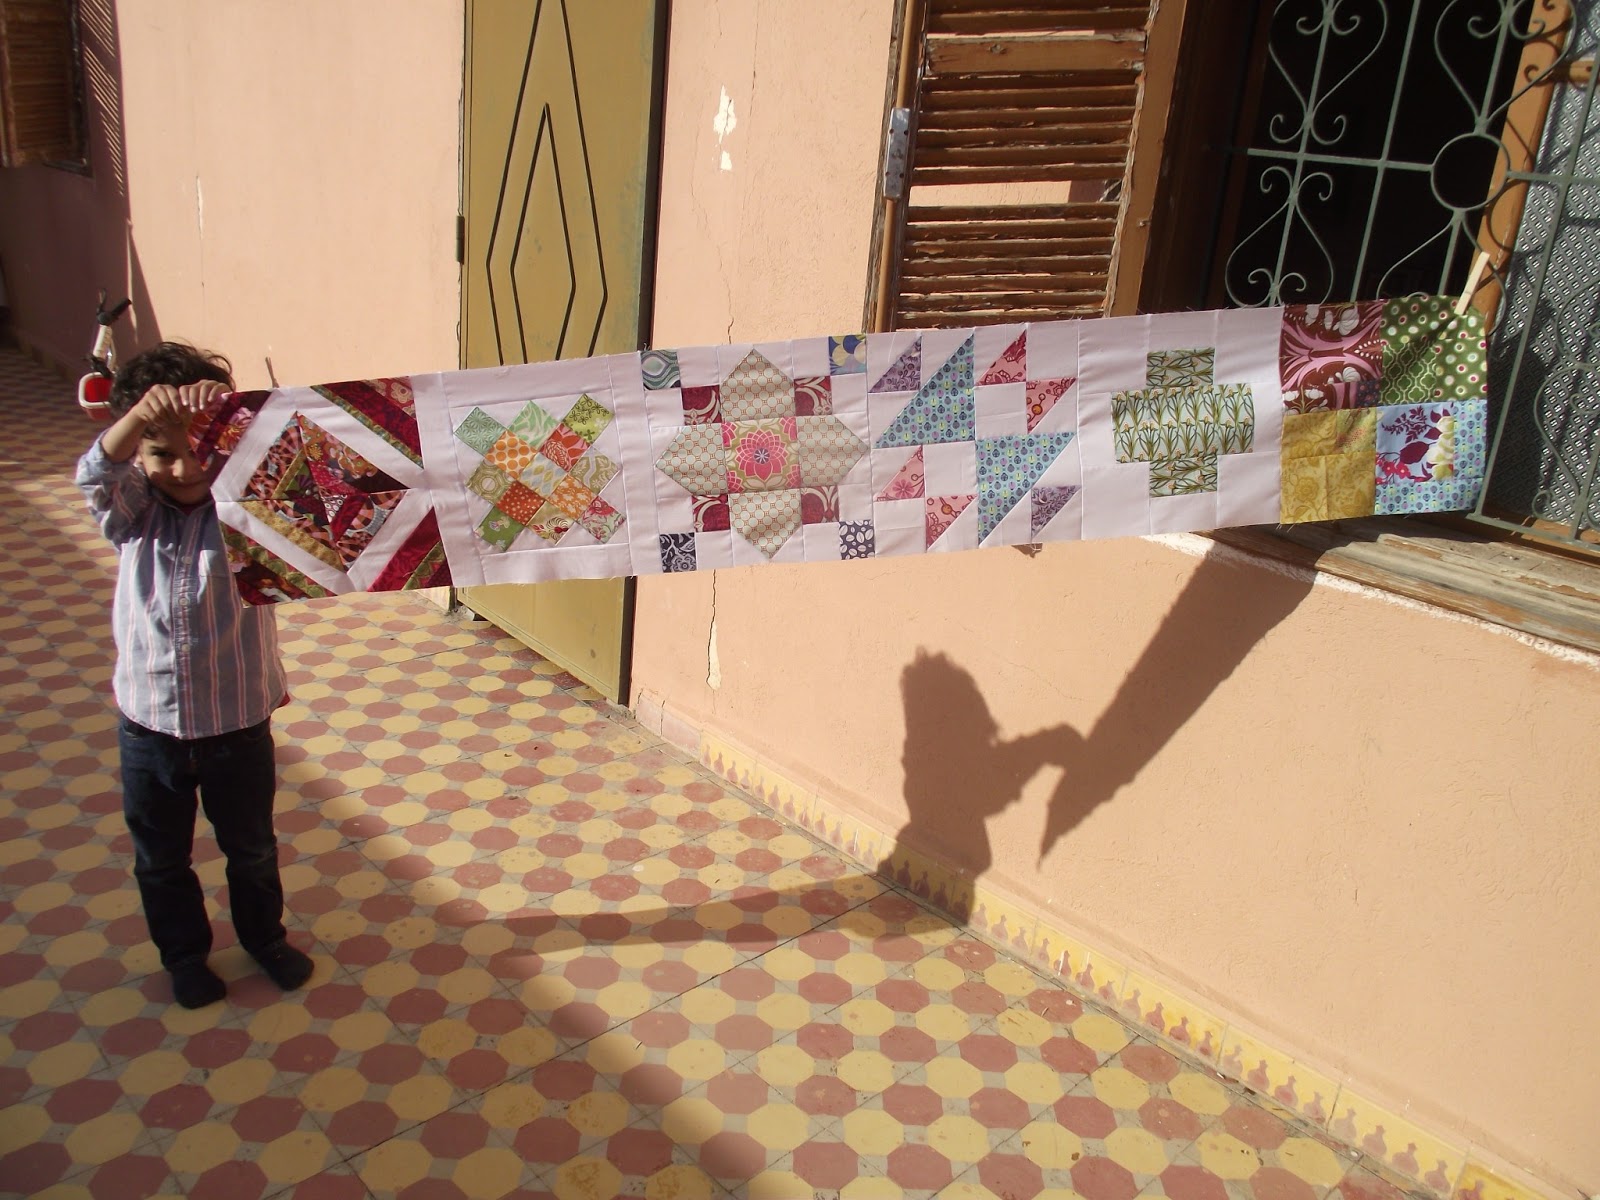
So without further ado, here it is...!!


...yup, the wrong way round! You can probably just make out the puzzled expression on hubby's face? As I was walking down the steps, I heard my husband say, "Shouldn't it be the other...?" "What did you say?" I asked. "Oh nothing..." he replied. Yes my clamshells and beads are the wrong way round but never mind!

Just look what everyone made.

Top Middle Susan has such a distinct style colourwise - just like her, it's always bright and cheerful.


Susan is the only member of the bee I have met (so far) - here she is sitting in her home at her favourite spot last 'summer'. I could have picked her block out blindfolded (well almost).  She made some super cute pieced balls which look like juggling balls and cleverly used Lu Summer's portholes technique for the rings at the top!

Top Right So Di assembled the quilt top and did a wonderful job and had to deal with the fact that I had asked for Kona white to be used but made my own blocks using Kona snow...go figure! She knows how much I love the Drunkard's Path block and made me some beauties using some of her gorgeous fabrics.

Middle Left Danny made me a beautiful block of appliqued pebbles - the prettiest pebbles you could imagine finding. I have made a small block of these myself and appliqueing them is not that easy but I love the effect and they bring beautiful movement to the quilt!

Middle This stunning Dresden was made by Helen in Switzerland and is a perfect centerpiece for the quilt.  It's bold and beautiful and uses some gorgous fabrics.

Middle Right This very cool block was made by Katy and uses the most beautiful palette of aqua, greys and yellows. I love its originality - it reminds me of a branch of beautiful blossom.

Bottom Left Hadley paper pieced this utterly gorgeous New York Beauty for me and boy is it beautifully pieced and Hadley used such lovely fabrics!

Bottom Middle We have 2 'Di's' in the group and this Di made me this stunning 'lemons & limes' block. I know Di doesn't like curves but these are so beautifully made and sounding like a broken record made in the most beautiful fabrics.

And I rotated the photo so you can see the quilt top the right way round!


Isn't it wonderful?  Thank you so much to my friends in this group - Susan, Hadley, Helen, Di, Katy, Danny and last but not least, our wonderful bee mama Di. I couldn't be happier. Round 2 starts next month.  We're sadly losing Danny but gaining 5 new members to bring the tally to 12.  I can't wait!

Do check out the other blogs today as the grand reveal continues!


Sunday 14 April 2013

The Liberté Egalité Fraternité Cushion - Le Challenge

So not everything turns out quite as you envisioned it but this is my entry for Lucy and Nat's monthly Le Challenge. The theme is geometrics and I used the humble rectangle.


Inspired by Rita's thouroughly modern and bright Liberty Lifestyle cushion, I thought I might try something similar using my Liberty tana lawn charms which I have been collecting from Ali over the last year. But compared to Rita's, this is definitely old school!


I cut the charms in half and alternated the layout so that they resembled bricks. I wish now that I had thrown in some of my low volume charms from Laura Jane's recent swap so that the crazy riot of colour and design was broken up but as I remind myself on a daily basis - it's a cushion (or a quilt). If it's less than perfect or I don't really like it, it really isn't the end of the world.


As frequent nominee and winner of the most unadventurous quilter award, I straight line quilted it by echoing the seams first vertically and then horizontally.

I backed it in some Tanya Whelan fabric that a friend recently donated to me after moving house making a simple envelope closure. The cushion form is 22" and this piece of fabric was big enough to fit!


So this retro style cushion shows that perhaps I really am a seventies child!  Thanks to Lucy and Nat for hosting.  For more adventurous interpretations of the monthly theme, click on the button below.

Le Challenge

Friday 12 April 2013

Pour Le Challenge


While playing with some Liberty charms this afternoon, I reckoned it was about time I make something for Lucy and Nat's monthly challenge aptly named Le Challenge.  Whereever you live in the world, everyone needs a little Liberty love of their own don't they?  So here is a sneaky peek of my make for the challenge - some Liberty tana lawn bricks. I shall reveal all on Monday when the linky opens up.

For more information on Le Challenge, head over here. This month's theme is geometrics and can be interpreted anyway you like and it can be any craft - not just sewing.  Susan has a great guest post today  and there is a great giveaway - a couple of her beautiful geometric inspired pouches.  What's not to love?


Le Challenge
F

Thursday 11 April 2013

Finish-A-Long Q2

So now's the time to link up with Leanne and list those UFOs that I would like to turn in to finishes before July.


It's warming up here and my sewing hours are going to become more limited so this is a modestish list...oh and my husband is starting to wear the 'how many quilts does a home in a hot climate need' failing to appreciate the aesthetic pleasure they give when casually draped over every available surface in the house.

My Cameo Giant Star needs basting, quilting and binding. This is a recent make but one I'm keen to see finished - it's so much prettier in person.  This photo doesn't do it justice!


My Godson's Union Jack quilt is shamefully lying in a heap after I attempted to quilt it a few weeks ago and dismally failed -  but I need to finish it so this will be first up.


My Drunkard in Central Park quilt top needs enlarging and finishing - a rollover from Q1. I love this quilt top - it's just too small but with some more Central Park FQs I bought at the beginning of the year I hope to make it a decent size.


My Stitch Tease quilt top has arrived and it's gorgeous - I can't wait to reveal it to you on Monday when all the bee members will do a collective ta-dah!! For the time being I shall remind you of one of my starter blocks I made for it - my theme was curves and I love these clamshells.  If I had the energy I would make a whole quilt of scrappy clamshells!


...and I shall save my hexies for Q3 when I shall have packed the machine away for a couple of months!

Are you joining in?

Tuesday 9 April 2013

Sticking to the Point

...or perhaps I should say - trying not to stitch over more than 300 of them!


Last Thursday, on a whim, I decided to cut in to my precious FQs of Anna Maria Horner's Field Study. Triangles it would be.  There was slashing and slicing and A LOT of triangles and no solids...no sashing.
Today, I finished the top.  It measures 60" x 73"

Some of the points are good. Are they all perfect? No.


Will I lose any sleep over them? No. This one is for me and I won't be checking any points when I'm snuggling underneath it.


There will be a brief hiatus while I order batting and wait for this backing fabric to arrive from Pink Castle - some Loulouthi Coreopsis voile, which will make it soft and very snuggly. Well at $6 a yard it would have been rude not to.

Coreopsis Voile in Lichen

It was fun piecing the triangles but sewing the numerous strips together wasn't so joyous.  Needles lost their lives as did pins.  Thanks to Fiona and Collette for encouraging me not to trim the triangles - it certainly helped matching points much easier.

I love this quilt top and it's fun to have ticked another off the bucket list.

Thursday 4 April 2013

The First Cut is the Deepest

I admit I was feeling a little overwhelmed this morning. You know how you start something and wonder whether you have bitten off more than you can chew?


You see 2 days ago I started something new...well I'd been so good the last few months...finishing up a few UFOs.  I'd been itching to cut in to my Field Study FQs for some weeks but couldn't decide what to do. I wanted the quilt to be dense with the patterns and little or no solids.  I had almost made my mind up to do a simple square patchwork quilt but an equilateral triangle quilt had been floating near the top of my bucket list for a while and I couldn't get the idea out of my head.

I took my 24 FQs of Field Study and cut it in to 6" strips so that I could get the max out of each piece. After quite a while working out exactly which was the 60° angle on my ruler, I cut...and cut...and really got my equilateral triangle vibe on until I had this 4 1/2" high pile of triangles. I followed Adrianne's excellent tutorial for cutting equilateral triangles here.


So this morning I followed Adrianne's advice and started trimming them - this really helps to avoid bulk when sewing them together...and I can pretend I have a Sizzix Big Shot (other fabric cutters are available).


...and made a slight dent in the pile until I had these pretties. As you can see, I have quite a few more to do.


So I couldn't resist making up a few strips to see whether they would look as I envisioned them together...


...and much to my relief they do! I used Adrianne's second tutorial here. They sew together really easily and while I didn't pin, I did follow her tip to find the straight grain before doing so as the strips don't then warp.

I'm feeling much less overwhelmed now.  I know I can sew them together and I love how they look. I'm excited about this quilt!